- What's New Here!
- The World of Microorganisms
- Cell Biology
- Plant Biology
- Understanding Phylum
- All about Fungi
- All about Bacteria
- Fascinating Tardigrades
- White Blood Cells
- Imaging Techniques
- Microscope Applications
- The Wonders of Nanotechnology
- Microscope History-Invention
- Microscope Quiz
- Privacy Policy
- Microbiology
- Bacteriology
- Parasitology
- Microscope Slides
- Microscope Function
- Cleaning Your Scope
- Experiments
- Cell Staining
- Different Types
- USB Computer
- Digital Camera
- Microscope Kits
- Student/Homeschool
- Younger Kids/Homeschool
- Metallurgical
- Scanning Probe
- AmScope Guide
- Levenhuk **NEW

Onion Root Tip Mitosis Stages, Experiment and Results
Mitosis refers to a type of cell division (cell cycle) through which the cell (parent cell) produces two identical daughter cells. Unlike meiosis, which is also a type of cell division , mitosis results in the production of two diploid daughter cells. The two daughter cells contain the same number of chromosomes as the parent cell.
Given that the process results in the proliferation of cells, it's important for general growth and replacement of damaged cells (e.g. the wound healing process).
In general, mitosis occurs through several stages that include:
- Prophase (divided into prophase and prometaphase)
Because of the rapid rate at which onion root tips grow as a result of rapid cell division, it's possible to observe and identify the different stages of mitosis.
For this section, the experiment will be divided into two main parts.
These include:
- Growing onion root tips
- Sample preparation
Growing onion roots
* Growing fresh root tips is recommended given that older or dried roots may produce poor results.
Requirements
- Uncut onions
- Clear glass or plastic jars
- Clean water
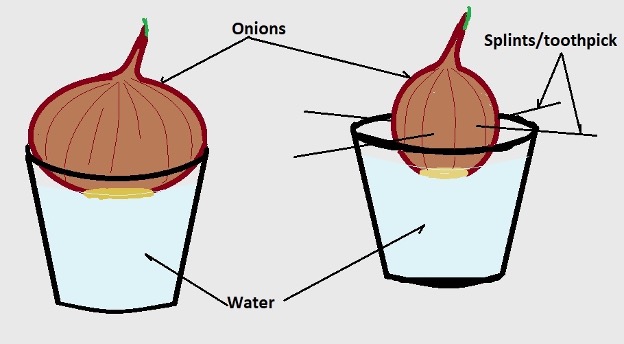
- Pour clean water into the clean (and clear) glass/plastic jars - about three-quarters full.
- Carefully place the onion bulbs in the glass/plastic jars so that only the lower surface of the onion comes in contact with the water.
- In a case where the onions are too small, they can be supported using toothpick/splints.
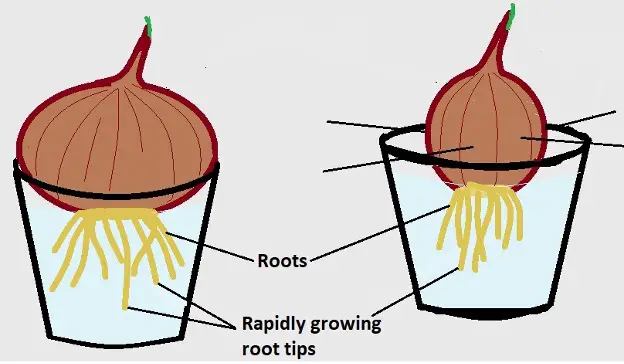
- Let the onions rest on water for 3-4 days - only the lower surface (base from which roots emerge) should be in contact with water.
The following are diagrammatic representations of this setup:
After 3 to 4 days, the onion roots will have grown to a length of about 1 inch.
Sample preparation
· 70 percent alcohol
· Aceto-alcohol
· Blade
· Forceps
· Glass slides
· Water
· Glycerin
· Stain - Aceto-carmine or Aceto-orcein
· Hydrochloric acid solution (1N HCL)
· Onion with freshly grown roots
· Microscope
· Stop clock
· Water bath
· Dissecting needles
* Having a pair of gloves, safety goggles, and safety mask is recommended given that some of the chemical used are hazardous.
· Using a blade or scalpel, carefully cut one or several roots from the onion and place them in a petri dish (or any other small clean container)
· Prepare a water bath (about 55 degrees C) - The temperature should be maintained at 55 degrees C. This may be achieved by using a thermostatically controlled water bath
· Carefully pour the hydrochloric acid solution into a small bottle and place it in the water bath for about 15 minutes in order to warm the acid
· Using a pair of forceps, carefully pick one or two of the roots and place them into the bottle of warm hydrochloric acid for about 5 minutes - This serves to break down pectin and calcium pectate as well as other tissues in order to release individual cells
· Remove the roots from the bottle of acid using the forceps and rinse them in tap water several times and then place them in a clean petri dish
· Using a clean blade, sharp scissors or scalpel, cut off the tips of the roots (about 5mm in length)
· Using the pair of forceps, pick the root tips, and put them into a vial of stain (acetic orcein or aceto-carmine) - Ensure that the root tips are completely immersed in the stain
· Place a cap/lid onto the vial (ensure that the cap/lid has a pinprick hole) and place the vial in the water bath (at 55 degrees C) for about 5 minutes - This enhances the staining process
· Using the forceps, remove the root tips from the vial of stain and place them onto a clean microscope glass slide
· Using a dissecting needle, you can gently mash/squash the root tips to spread out the cells on the glass slide - This prevents several layers of cells from overlapping which would otherwise affect the quality of results
· Cover the sample (root tip) with a coverslip and gently press the coverslip down, then examine the slide under the microscope starting with low magnification
* For this experiment, a properly prepared slide should appear light pink due to the stain to almost colorless.
* Unused roots can be stored in 70 percent alcohol.
An onion has a total of 8 pairs of chromosomes. This is especially beneficial for this experiment given that fewer chromosomes are slightly easier to see when they condense.
As mentioned, onion root tip cells divide rapidly as the roots elongate to absorb water and various minerals from the soil.
For this reason, it's possible to identify different stages of cell division by mitosis based on chromosomal distribution.
When viewed under the microscope, a properly prepared slide will yield the following results:
Under 10X magnification
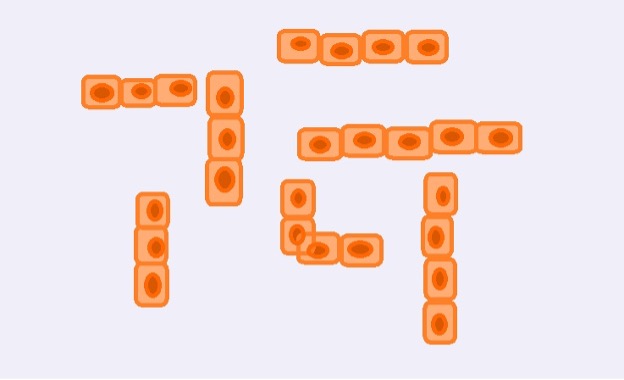
Under 10X magnification, students will be able to observe several single layers of cells. Depending on how well the slide was prepared, the cells are spread out without any overlapping or with very little overlapping.
* Generally, a row of cells (single layer) may consist of between 2 and 5 cells.
The following is a diagrammatic representation of onion root tip cells under 10X magnification:
Higher magnification (stages of mitosis)
Under high magnification (100X-500X), it becomes possible to identify cells at different stages of mitosis.
Interphase
While this is not necessarily one of the main stages of mitosis, cells in this state can easily be identified by their prominent nucleoli.
Diagrammatic representation of an onion root tip cell during interphase:
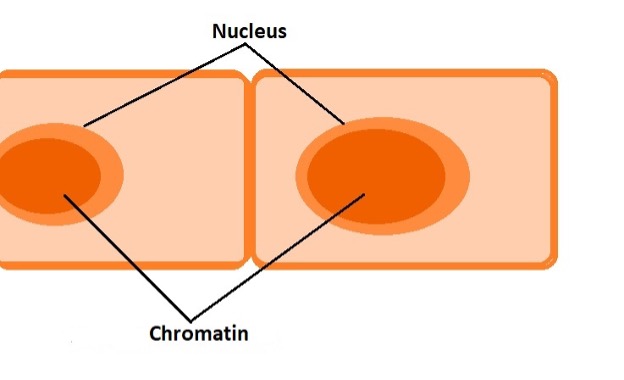
During interphase, also known as the resting stage, the chromatin is not tightly packed. This allows for DNA to be copied (replication) as the cell prepares for cell division.
Generally, interphase is divided into three main phases that include:
· G1 (First gap phase) - Characterized by cell growth and normal cellular activities
· S phase (Synthesis) - This is the phase in which DNA is replicated so that the DNA content is doubled
· G2 phase (second gap phase) - During this phase, the cell prepares for division
During this stage of mitosis, the nucleolus is still visible. However, the nucleus appears grainy due to chromosomal condensation.
The following is a diagrammatic representation of an onion root tip cell during prophase:
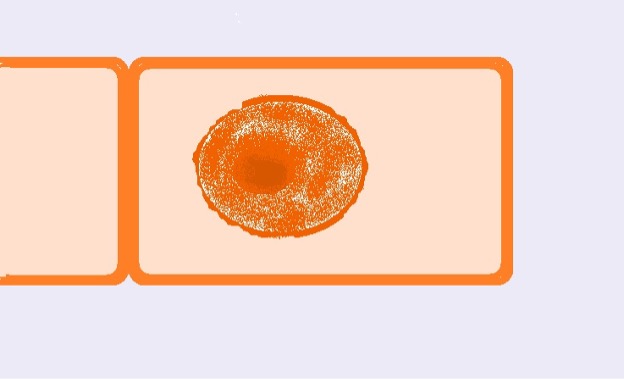
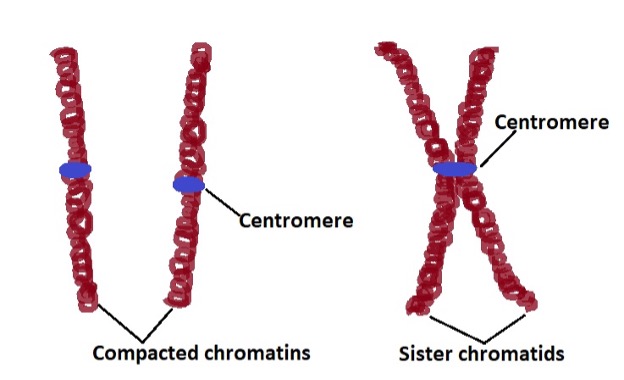
As mentioned, the DNA strands are uncoiled during interphase for transcription to occur. In this state, the DNA is said to be uncondensed. Here, this genetic material is also referred to as chromatin. During prophase, condensed DNA and some proteins form the chromatids which join to become chromosomes (X-shaped).
Sister chromatids, which contain the same genetic information, are attached at a region known as the centromere which gives the structure an X shape.The kinetochore, which is the site at which microtubules join the chromosomes is also located at the centromere.
* As the chromatins coil, it becomes increasingly compact which allows the chromosomes to become more visible when viewed under high magnification.
* It's also during prophase that spindle microtubules (mitotic spindle) start forming near the nucleus.
Prometaphase
Prometaphase is the second stage of mitosis (it has also been referred to as late prophase). This stage is characterized by increased condensation of chromosomes as well as the breakdown of the nuclear envelope (nuclear membrane).
The nuclear envelope, which consists of an inner and outer membrane, is stabilized by polymerization of lamin proteins (the nuclear lamina). Polymerization of the lamins and the consequent breakdown of filaments into lamin dimers results in the disassembly of the nuclear membrane.
Apart from increased condensation of the chromosomes and breakdown of the nuclear envelope, this stage is also characterized by the development of kinetochore around the centromere. Moreover, spindle fibers (kinetochore microtubules) have also been shown to start developing during prometaphase and permeate through the disappearing membrane to attach to the chromosomes at the kinetochore.
* This stage of mitosis is important because chromosomes (sister chromatids) have to be released from the nuclear membrane in order to be separated in the next stage.
Metaphase
In this stage of mitosis, chromosomes align along the equatorial plane of the cell (cell equator) so that the sister chromatids can be separated. During metaphase, chromosomes become more visible because of increased condensation as well as the fact that the nuclear envelope has disappeared.
Diagrammatic representation of a cell during metaphase:
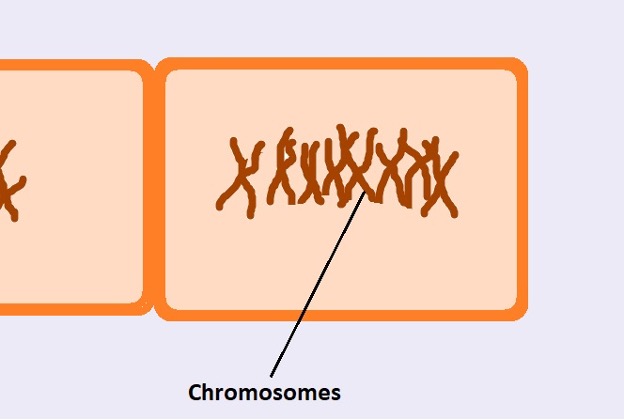
Given that the nuclear membrane completely disappears during metaphase, the chromosomes appear in the cytoplasm . As well, the fully developed spindle fibers originating from the centrioles , located on opposite poles of the cell, attach to each of the sister chromatids which contribute to their alignment at the cell equator.
Based on microscopic studies, spindle fibers (microtubules made of proteins) have been shown to be about 25nm in diameter. While they originate from the centrioles and extend to attach to the sister chromatids, they have also been shown to be constantly forming because they are continually broken down.
As new components (building blocks) are added on one end of the microtubules and removed from the other, it has been suggested that this causes the microtubules to pull the centrioles which in turn contributes to the alignment of the chromosomes.
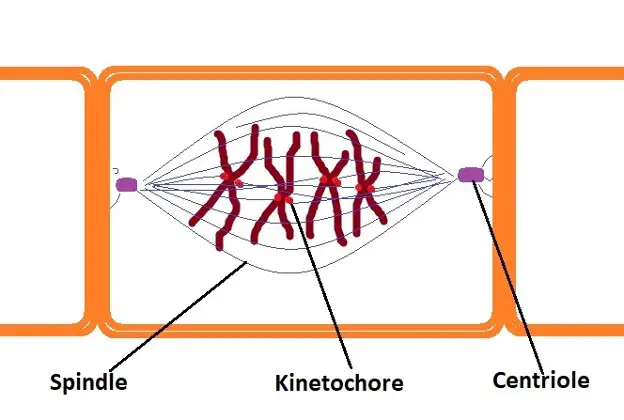
* In late metaphase, the pulling actions of the microtubules, as well as the centrioles, result in the kinetochores (the region at which spindle fibers attach to the chromosomes) facing different directions.
During anaphase, the chromosomes start separating and moving from the equatorial plate of the cell. At the end of this stage (late anaphase), the sister chromatids completely separate and reach the opposite poles of the cell.
In this stage, it's also possible to clearly identify the chromatids given that the process occurs in the cytoplasm.
Diagrammatic representation of a cell during late anaphase:
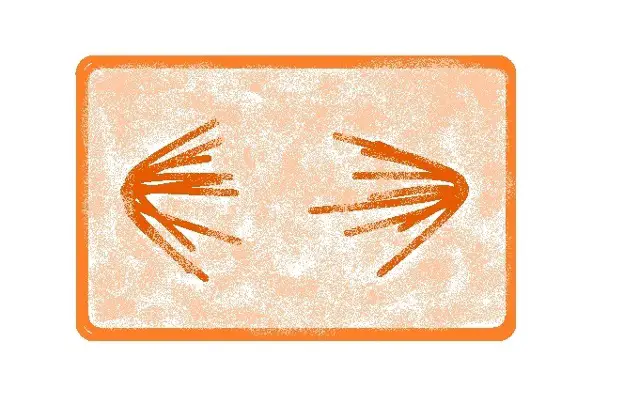
Based on microscopic studies, sister chromatids have been shown to separate and move to the opposite poles of the cell at a rate of between 0.2 and 4 um per minute. Initially, polymerization and depolymerization of microtubules was thought to result in the separation and movement of chromatids to the opposite poles of the cell.
As a result of the depolymerization process, microtubules shorten thus pulling apart the sister chromatids. As well, polymerization of some of the microtubules, those that extend from one pole of the cell to the other without attaching to the chromatids, causes them to grow in length thus pushing poles of the cell apart.
Based on recent studies, however, it has become evident that separation of sister chromatids during anaphase is the result of the actions of enzyme seperase as well as shortening of microtubules.
Here, the enzyme seperase has been shown to break down cohesin (a component of centromere that links sister chromatids).
Following the separation of sister chromatids, through the breakdown of the protein cohesin, shortening of microtubules (kinetochore microtubules/spindle) pulls the chromatids to the opposite poles of the cell.
* Some of the other factors suggested to contribute to the separation of sister chromatids include the pulling actions of astral microtubules (pulling the poles apart) while interpolar microtubules slide past each other.
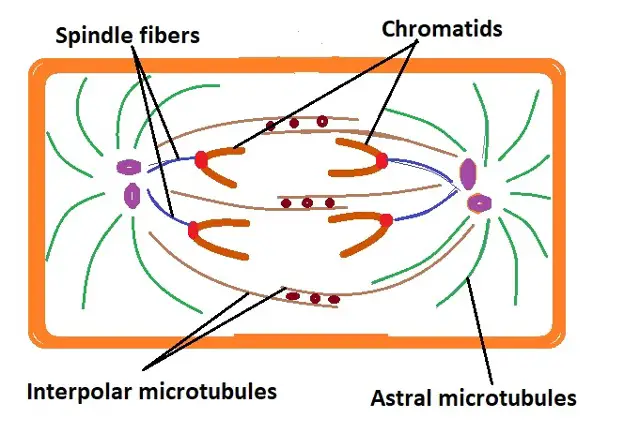
Telophase is the fifth stage of mitosis characterized by several key events. These include arrival of the chromosomes at the opposite poles of the cell, gradual breakdown of the spindle fibers as well as development of nuclear envelopes around each set of chromosomes (at the opposite ends/poles of the cells).
Diagrammatic representation of a cell during telophase (late telophase):
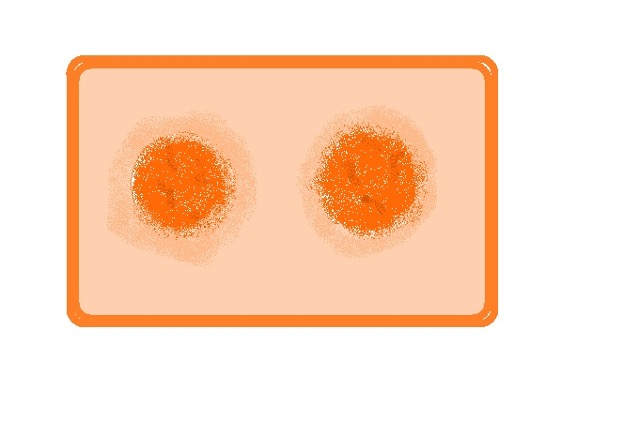
As nuclear envelopes develop around each set of chromosomes located at the opposite poles of the cell, two nuclei are formed in the cell. The DNA also starts to uncondense so that genetic material can be copied later.
Given that the spindle fibers are no longer required, they start to disassemble (break down) in early telophase and continue to do so in late telophase.
Cytokinesis
Cytokinesis refers to the process through which the cytoplasm separates as the cell divides into two identical daughter cells. Unlike animal cells, plant cells have a rigid cell wall that prevents the cell from easily pinching apart to form two identical daughter cells.
For this reason, the process of cytokinesis is different in these cells ( plant cells ). During late telophase and early cytokinesis, carbohydrate filled vesicles are released by the Golgi bodies and occupy the equator region of the cell. The vesicles continue fusing to form the cell plate which divided the cell into two.
Here, the carbohydrates contained in the vesicles form the middle lamella between the membrane of the two cells. The cellulose produced by the two new cells occupies the region between the middle lamella and cell membrane to form the primary cell wall for the two daughter cells.
Microscope Experiments
Difference between Meiosis and Mitosis
Return to Onion Cells under the Microscope
Return from Onion Root Tip Mitosis to Microscopemaster home
Cooper GM. (2000). The Cell: A Molecular Approach. 2nd edition.
Donald, B. and Richard, J. (2018). Cell Division. An Atlas of Comparative Vertebrate Histology.
Lian, Y. and Chirop, M. (2016). Functional Cell Biology. Encyclopedia of Cell Biology.
Lodish H, Berk A, and Zipursky SL, et al. (2000). Microtubule Dynamics and Motor Proteins during Mitosis: Molecular Cell Biology. 4th edition.
https://employees.csbsju.edu/ssaupe/biol115/cell_division.htm
https://www.yourgenome.org/facts/what-is-mitosis
https://www.nature.com/scitable/topicpage/chromosomes-14121320/#:~:text=During%20interphase%20(1)%2C%20chromatin,mitosis%20(2%2D5) .
Find out how to advertise on MicroscopeMaster!

MicroscopeMaster.com is a participant in the Amazon Services LLC Associates Program, an affiliate advertising program designed to provide a means to earn fees by linking to Amazon.com and affiliated sites.
Recent Articles
Deltaproteobacteria - Examples and Characteristics
Nov 01, 22 04:44 PM
Chemoorganotrophs - Definition, and Examples
Oct 26, 22 05:01 PM
Betaproteobacteria – Examples, Characteristics and Function
Oct 25, 22 03:44 PM
The material on this page is not medical advice and is not to be used for diagnosis or treatment. Although care has been taken when preparing this page, its accuracy cannot be guaranteed. Scientific understanding changes over time.
** Be sure to take the utmost precaution and care when performing a microscope experiment. MicroscopeMaster is not liable for your results or any personal issues resulting from performing the experiment. The MicroscopeMaster website is for educational purposes only.
Privacy Policy by Hayley Anderson at MicroscopeMaster.com All rights reserved 2010-2021
Amazon and the Amazon logo are trademarks of Amazon.com, Inc. or its affiliates
Images are used with permission as required.
- Biology Article
Study Of Mitosis In Onion Root Tip Cells
Aim of the experiment.
To study and demonstrate mitosis by preparing the mount of an onion root tip cells.
Theory Of The Experiment
For entities to mature, grow, maintain tissues, repair and synthesize new cells, cell division is required. Cell division is of two types:
In mitosis , the nucleus of the Eukaryotic cells divides into two, subsequently resulting in the splitting of the parent cells into two daughter cells. Hence, every cell division involves two chief stages:
- Cytokinesis – Cytoplasm division
- Karyokinesis – Nucleus division
Stages Of Mitosis
The various stages of mitosis are:
1. Prophase
- The process of mitosis is initiated at this stage wherein coiling and thickening of the chromosomes occurs
- Shrinking and hence the disappearance of the nucleolus and nuclear membrane takes place
- The stage reaches its final state when a cluster of fibres organizes to form the spindle fibres
2. Metaphase
- Chromosomes turn thick in this phase. The two chromatids from each of the chromosomes appear distinct
- Each of the chromosomes is fastened to the spindle fibres located on its controller
- Chromosomes align at the centreline of the cell
3. Anaphase
- Each of the chromatid pair detaches from the centromere and approaches the other end of the cell through the spindle fibre
- At this stage, compressing of the cell membrane at the centre takes place
4. Telophase
- Chromatids have reached the other end of the cell
- The disappearance of the spindles
- Chromatin fibres are formed as a result of uncoiling of daughter chromosomes
- The appearance of two daughter nuclei at the opposing ends due to the reformation of the nucleolus and nuclear membrane
- At this phase, splitting of the cell or cytokinesis may also occur
Post mitosis, the next stage is referred to as interphase, which is part of the cell cycle that is non-dividing and between two consecutive cell divisions . A cell spends most of its life in the interphase. It comprises the G1, S and G2 stages.
Why is onion root tip used to demonstrate mitosis in this experiment?
It is because of the meristematic cells that are situated in the tip of the roots that render the most desirable and suitable raw material to study the different stages of mitosis. Onion is a monocot plant. Monocotyledonous plants possess large chromosomes that are clearly visible. Hence, their root tips are used. The period of time taken for mitosis varies as it is dependent on the cell type and type of species.
Is mitosis influenced by any factor? If yes, name them.
Yes, mitosis, the cell cycle is affected by various factors such as time and temperature.
Materials Required
- Compound microscope
- Acetocarmine stain
- N/10 Hydrochloric acid
- Filter paper
- Aceto alcohol (Glacial acetic acid and Ethanol in the ratio 1:3)
- Glass Slide
- Onion root peel
- Watch glass
Procedure Of The Experiment
- Place an onion on a tile
- With the help of a sharp blade, carefully snip the dry roots of the onion
- Place the bulbs in a beaker containing water to grow the root tips
- It may take around 4 to 6 days for the new roots to grow and appear
- Trim around 3 cm of the newly grown roots and place them in a watch glass
- With the help of forceps, shift it to a vial holding freshly prepared aceto-alcohol i.e., a mixture of glacial acetic acid and ethanol in the ratio 1:3
- Allow the root tips to remain in the vial for one complete day
- With the help of forceps, pick one root and set in on a new glass slide
- With the help of a dropper, allow one drop of N/10 HCl to come in contact with the tip of the root. Additionally, add around 2 to 3 drops of the acetocarmine stain
- Heat it lightly on the burner in such a way that the stain does not dry up
- Excessive stain can be carefully treated using filter paper
- The more stained part of the root tip can be trimmed with the help of a blade.
- Discard the lesser stained part while retaining the more stained section
- Add a droplet of water to it
- With the help of a needle, a coverslip can be mounted on it
- Gently tap the coverslip with an unsharpened end of a needle in order for the meristematic tissue of the root tip present under the coverslip to be squashed properly and to be straightened out as a fine cell layer
- The onion root tip cells’ slide is now prepared and ready to be examined for different stages of mitosis
- Observe and study mitosis by placing the slide under the compound microscope. Focus as desired to obtain a distinct and clear image
Observations and Conclusion
- The slide containing the stained root tip cells is placed on the stage of the compound microscope, changes taking place are noted and sketched.
- The different phases of mitosis, such as prophase, metaphase, anaphase and telophase can be observed.
Viva Questions
Q.1. Why is mitosis also referred to as the equational division?
A.1. It is because the chromosome number present in the daughter cells is the same as the number of chromosomes present in the parent cell.
Q.2. To study mitosis, what is the best time to harvest onion root tips and why?
A.2. Early morning is the best time as the root tips actively undergo cell division in the morning. When such a material is used, all stages of cell division can be observed and studied.
Q.3. Other than an onion, can you suggest any other raw material for the study of mitosis.
A.3. Dividing cells of these can be picked:
- Shoot apex of plants
- Cells from the root tips of any herbaceous plants
- Gills of fish (epithelial cells)
- Tadpole larvae (tail)
Q.4. For the cytological study, why are different parts of monocots preferred?
A.4. Since they possess larger chromosomes that are clearly visible under a light microscope.
Q.5. Why is the stain acetocarmine used in this experiment?
A.5. This stain is used to study chromosomes as it stains them in a deep red tint without staining the cytoplasm.
Q.6. Where does the spindle fibre originate from?
A.6. The spindle fibres originate from:
- In-plant cells – Cytoplasm
- In animal cells – Centrioles
Q.7. Mention the phase of the cell division in which chromosomes are observed distinctly.
A.7. Metaphase. They are shortest and thickest in this stage and in their condensed form.
Q.8. During metaphase, which chemical can be used to stop the cell division process?
A.8. The spindle fibre formation can be inhibited by Colchicine during this stage.
Q.9. Where is colchicine obtained from?
A.9. Colchicum autumnale plant belonging to the Liliaceae family.
Q.10. Where does mitosis occur?
A.10. This type of cell division takes place in the vegetative cells.
Explore more biological concepts and other experiments on imbibition and transpiration by registering at BYJU’S.
Further Reading

Put your understanding of this concept to test by answering a few MCQs. Click ‘Start Quiz’ to begin!
Select the correct answer and click on the “Finish” button Check your score and answers at the end of the quiz
Visit BYJU’S for all Biology related queries and study materials
Your result is as below
Request OTP on Voice Call
Leave a Comment Cancel reply
Your Mobile number and Email id will not be published. Required fields are marked *
Post My Comment
Thank you for clearly explained and good content.

Register with BYJU'S & Download Free PDFs
Register with byju's & watch live videos.
Arlie's Instruction Manuals

Onion Root Tip Mitosis
Introduction.
In this experiment, we will be using on onion root tip to show the different stages of mitosis. According to the National Human Genome Research Institute, “Mitosis is the process where the cells replicate their chromosomes and then segregates them, producing two identical nuclei in preparation for cell division.” Mitosis is very important to every living organism. Humans use mitosis to create more skin cells, blood cells, muscle cells and more.
Mitosis occurs through different stages. These stages are Prophase, Metaphase, Anaphase and Telophase. The reason why we are using an onion in this experiment is because their root tips grow at a rapid rate due to rapid cell division, which allows us to identify the different stages of mitosis.
In the Results section in the procedure, there will be further explanation on what each stage will look like.
Here are vocabulary terms to be familiar with (click on the word to be taken to the National Human Genome Research Institute website for their definitions):
TECHNICAL BACKGROUND
In order to understand how to do this experiment, you will need to have background on how to work a microscope and how to prepare 1M solution on HCL.
WARNINGS, CAUTIONS, AND DANGERS
- Wear goggles, gloves and lab coat
- Sharp Objects
- Hot surfaces
- This experiment is not edible
- Glass/Plastic Jar
- Blade/Scalpel
- 2 Petri Dish or Small Clean Container
- Medium to Large Glass
- Hot Plate/ Stove
- Small Bottle
- Thermometer
- Vial with Cap/Lid
- Microscope Glass Slide
- Dissection Needle
- 70% Alcohol
- Stain (acetic orcein or aceto-carmine)
Growing Onion Roots:
- Pour water into a clean, clear glass/plastic jar. Fill it about 3/4 full.
- Place the onion bulbs in the jar so that only the lower surface of the onion comes into contact with the water. (If the onion is too small, place toothpick into the onion to keep the only the lower surface in the water and the rest above.)
- Let the onions rest on water for 3-4 days.
Sample Preparation:
- Using a blade or scalpel, carefully cut one or several roots from the onion and place them in petri dish or any small clean container.
- In a medium to large glass container, prepare a water bath.
- If able, set your hot plate to 55 degrees C and place your water bath on it. If you do not have a hot plate, heat your water bath to a stable temperature of 55 degrees C.
- Carefully pour the hydrochloric acid solution into a small bottle and place it in the water bath for about 15 minutes to warm the acid.
- Using the forceps, carefully pick one or two of the roots and place then into the bottle of warm hydrochloric acid for about 5 minuets.
- Remove the roots form the bottle of acid using the forceps and rinse them with tap water several times.
- Place the root tips into a clean petri dish.
- Using a clean blade, cut off the tips of the roots. (about 5 mm in length)
- Using the forceps, pick the root tips and put them in the vial of stain. (acetic orcein or aceto-carmine)
- Make sure the root tips are completely in the stain.
- Place a cap/lid on the vial and make a prick hole through the cap/lid.
- Place the vial in the water bath for about 5 minutes.
- Using the forceps, remove the root tips from the vial of stain and place them onto a clean microscope glass slide.
- Using a dissection needle, gently mash/squash the root tips to spread out the cells on the glass slide.
- Cover the glass slide with a coverslip and gently press the coverslip down.
- Examine the slide under the microscope.
Viewing slides under 10x magnification:
Students should be able to observe several single layers of cells.
- Note: This magnification will not show the stages of mitosis. It will show a row of cells the generally consists of 2 and 5 cells.

Viewing slides under higher magnification (100x-500x)
Students should be able to observe the different stages of mitosis under higher magnification.
The stages that should be visible are:
Interphase is not a part of mitosis, but it is the preparation step. Interphase includes G1, which is characterized by cells growth, S phase, which is where the DNA is replication, and G2, which is where the cells prepares to enter mitosis or M phase.
The way to identify interphase is to notice that the chromatin is not tightly packed.

Prophase is the first step of mitosis. In prophase, the chromatids form together to make the chromosomes. These chromatids that are formed together are called the sister chromatids, which contain the same genetic information and are attached at the centromere. Another important structure that is forming is the mitotic spindle. This structure will be important during a later stage.
During this stage, the nucleolus is still visible, but the nucleus is grainy due to chromosomal condensation.

Prometaphase
This is the second stage of mitosis. During this stage the chromosomes are still condensing, but the nuclear envelope is broken down. Not only are these things happening, but kinetochore start to develop around the centromere.

This is the third stage of mitosis. During this stage, the sister chromatids align along the middle of the cell, preparing for the sister chromatids to be separated. The chromosomes, during this stage, become more visible. Also, the fully developed spindle fibers, located on two different sides of the cell, attach to each of the sister chromatids.

This is the fourth stage of mitosis. During this stage, the two sister chromatids start separating and moving towards the opposite side of the cells.

This is the fifth and final stage of mitosis. During this stage, many different events are taking place. The chromosomes are at the opposite ends of the cell, the breakdown of the spindle fibers begin, the development of the nuclear envelope starts to form around the two sets of chromosomes that are on the opposite ends of the cell, and the DNA starts to de-condense.

Cytokinesis
This step is not a part of the the mitosis phase, but is followed directly after this. During this step, the cytoplasm separates as the cell divides into two identical daughter cells, but since plat cells have cell walls that prevent them from pinching apart, we are not able to see this happening.
Dispose of all solid waste in the trash and all liquid waste can be disposed down the drain with lots of water.
Helpful Video:
“Mitosis.” Genome.Gov , www.genome.gov/genetics-glossary/Mitosis. Accessed 12 May 2024.
Microscope Master. “Onion Root Tip Mitosis.” Microscope Master, Microscope Master, n.d., www.microscopemaster.com/onion-root-tip-mitosis.html .
Practical Biology
A collection of experiments that demonstrate biological concepts and processes.
Observing earthworm locomotion
Practical Work for Learning
Published experiments
Investigating mitosis in allium root tip squash, class practical.
Talking about what chromosomes do during mitosis could be very interesting, but seeing them for yourself adds an extra dimension. There are several protocols available for this work and it is notoriously unreliable – often you will not find many dividing cells at all.
This protocol has been tested by the Practical Biology website development team and brings together ideas from SAPS, contributions to the Biotutor discussion list from current teachers, and material from Nuffield Revised Advanced Biology (Longman, 1986).
Lesson organisation
The allium roots need to be prepared 1-10 days in advance of the lesson. Some practitioners report that cutting the root tips around noon makes a difference to the mitotic index, so you may want your technician to cut and ‘fix’ the tips in ethanoic alcohol rather than ask your students to carry out this step.
If you have access to a video microscope it is worth capturing some images, as this procedure can be frustrating.
Apparatus and Chemicals
For each group of students:.
Water bath at 60 °C
Hydrochloric acid, 1 M, 10-25 cm 3 per working group ( Note 4 )
Watch glass (or small dish)
Beaker, 100 cm 3 , 2
Mounted needle
Microscope slide
Paper towels
For the class – set up by technician/ teacher:
Alliums with sprouting roots – garlic is often recommended, or onions ( Note 1 )
Ethanoic alcohol (in dropper bottles) – 3:1 absolute ethanol: glacial ethanoic acid ( Note 2 )
Stain, in dropper bottles, 1 per group ( Note 3 )
Health & Safety and Technical notes
Take care with ethanoic alcohol, hot hydrochloric acid, and with the stain. Wear eye protection when handling these. Carry scalpels with care – hold them on a tile as you walk around the laboratory.
Read our standard health & safety guidance
1 Garlic cloves are most often suggested as a source of root tips. Fresh garlic will sprout overnight if a clove is supported so that it just touches the surface of some water in a vessel – either by simply inserting the clove firmly into a test tube (or boiling tube) of suitable diameter, or by sticking a cocktail stick through the middle of the clove and supporting on the neck of a wider vessel, or cutting holes in expanded polystyrene sheet and inserting the cloves before floating the polystyrene on the surface.
Set up some roots to sprout 10 days before use, some 5 days before use, some 2 and some 1 day before use so that students can compare the rate of mitosis in young and older root tips.
Some practitioners report that cutting the root tips at close to midday makes a difference to the number of dividing cells, so you may want your technician to cut and ‘fix’ the tips in ethanoic alcohol before use. Roots that have been set to sprout for 2 to 5 days seem to give the highest likelihood of finding actively dividing cells.
Alternatives to garlic include onions, hyacinths or seedlings of beans or peas – as long as they are healthy and fast growing.
2 Ethanoic alcohol (“Farmer’s fluid”) is 3 parts absolute ethanol (highly flammable) to 1 part glacial ethanoic acid (Hazcard 38 A describes this as flammable and corrosive). Mix just before use, adding the acid to the alcohol. You can use ethanol IDA or 95% ethanol instead (Hazcard 40 A – highly flammable and harmful due to the presence of methanol), but chromosomes may not be as clearly defined. Root tips can be kept in this fluid for several months.
Ethano-orcein stain: Grind 1.5 g of solid orcein (described on Hazcard 32 as low hazard) with a pestle and mortar. In a fume cupboard, mix 90 cm 3 of glacial ethanoic acid (Hazcard 38A describes this as flammable and corrosive) with 110 cm 3 of distilled water and bring to the boil. Pour the boiling mixture over the orcein and stir very thoroughly (still in the fume cupboard). Leave overnight, then filter and store in a tightly-stoppered dark bottle. If it overstains, dilute with 45% ethanoic acid and try again.
Propionic orcein (made with propionic acid rather than ethanoic) has the advantage that it evaporates more slowly, and is sometimes suggested for this practical.
Toluidine blue – Hazcard 32 describes this as low hazard. Dissolve 0.5 g of solid toluidine blue in 100 cm 3 of water.
4 Hydrochloric acid: Hazcard 47A recommends eye protection when working with hydrochloric acid at 1.0 M. If the acid is hot (60 °C) this is especially important.
5 Whichever stain or squashing technique you use, avoid excess stain or pieces of tissue will drift to the edge of the coverslip and be lost. If you introduce too many air bubbles, add more stain after squashing, using a fine dropping pipette.
6 You can delay squashing for several hours. This allows the cells to take up the stain and to harden, which reduces the chance of them bursting.
SAFETY: Ethanoic ethanol is corrosive, so wear eye protection (goggles). Ethano-orcein stain contains ethanoic acid and also requires you to wear goggles when it is dispensed. You should wear eye protection when handling hot hydrochloric acid. Take care with scalpels and always carry them on a white tile.
Preparation
a Cut off 1-2 cm of the root tips. Put in a small volume of ethanoic acid on a watchglass (or other shallow dish) for 10 minutes. b Meanwhile, heat 10-25 cm 3 of 1 M hydrochloric acid to 60 °C in a water bath.
c Wash the root tips in cold water for 4-5 minutes and dry on filter paper.
d Use a mounted needle to transfer the root tips to the hot hydrochloric acid (see b ) and leave for 5 minutes.
e Wash the root tips again in cold water for 4-5 minutes and dry on filter paper.
f Use the mounted needle to remove two root tips onto a clean microscope slide.
g Cut each about 2 mm from the growing root tip. Discard the rest, but keep the tips ( Note 2 ).
h Add a small drop of stain and leave for 2 minutes ( Note 3 and Note 5 ).
i Break up the tissue with a mounted needle.
j Cover with a coverslip and squash ( Note 6 ) using method A or method B below.
Method A Place the slide and coverslip on a double layer of paper towel and fold the paper over the coverslip. Make certain that the slide is on a flat surface and squash down on the coverslip with a strong vertical pressure, using your thumb. Do not twist or roll the thumb from side to side Method B Tap the coverslip about 20 times by dropping a wooden mounted needle or a pencil, blunt end down, from a height of about 5 cm onto the middle of the coverslip.
Investigation
k View the root tips under a microscope (x400 magnification) and look for the chromosomes within cells which are actively dividing.
l Locate the meristematic zone, which has small, apparently ‘square’ cells with nuclei which are large relative to the whole cell area.
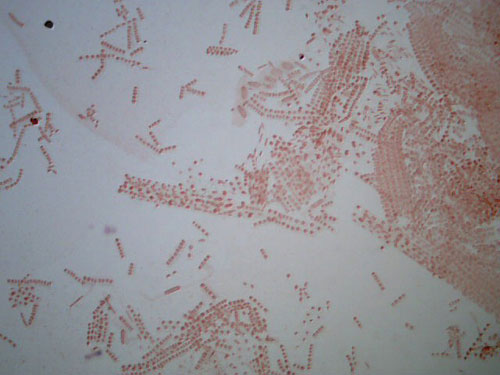
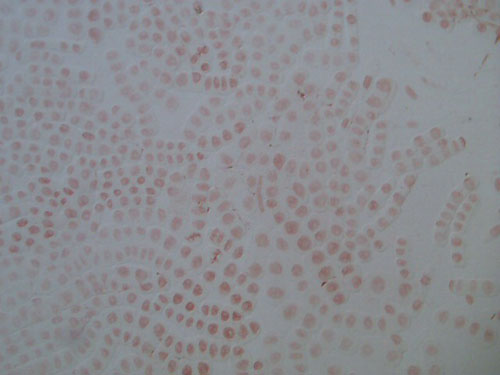
The duration of each stage of mitosis has been recorded and the data (see table below) could be used to compare the observed frequencies of the different stages as recorded by students.
These two images show the view that is typical when exploring an allium root tip squash. These slides are of root tips that were cut and fixed after 2 days of growing.
The first is a low power image, and the second a high power close up of a portion of the same slide.
http://www-saps.plantsci.cam.ac.uk This link is to the home page of the Science and Plants for Schools (SAPS) website with links to their teaching resources. (Website accessed October 2011)
Optional Lab Activities
Learning objectives.
Having completed the lab on mitosis, you should be able to:
- define the following terms: chromosome, spindle, centromere, centrosome, gametes, somatic, cytokinesis, cleavage furrow, homologues (homologous chromosomes),
- list the stages of the cell cycle in order
- describe the cellular events that occur during interphase (be sure to include the specific portions of interphase such as G1, S and G2)
- describe the overall process of mitosis (what is the purpose and the outcome of mitosis)
- describe the events of prophase of mitosis
- describe the events of metaphase of mitosis
- describe the events of anaphase of mitosis
- describe the events of telophase of mitosis
- explain what is meant by a diploid chromosome number versus a haploid chromosome number
- if given the chromosome number of the parent cell, determine what the chromosome number of the daughter cells would be after mitosis
http://www.slideshare.net/CandelaContent/mitosis-lab
Introduction
According to the cell theory of biology, all cells arise from pre-existing cells. In eukaryotes, this generally occurs by the process of mitotic cell division, which involves the separate but often coordinated processes of cytokinesis (division of the cytoplasm and organelles) and mitosis (division of the nucleus and associated DNA). Mitosis without the co-occurance of cytokinesis leads to the production of multinucleated cells, such as those found naturally in skeletal muscle and cardiac muscle. Mitotic cell division leads to the production of genetically identical daughter cells from existing parent cells. Mitotic cell division is used in asexual reproduction, growth, and repair. Meiosis is another form of cell division in eukaryotes that leads to the production of gametes. While the process of mitosis is continuous process within the cell cycle (i.e., it doesn’t occur in discrete steps), biologists are classifiers and tend to place things into discrete categories. Mitosis is commonly divided into four major phases: prophase, metaphase, anaphase, and telophase. You may find that some accounts of mitosis further subdivide the process to include prometaphase between prophase and metaphase. In this exercise, we will consider prometaphase a component of prophase.
Part 1. Mitosis Diagram
Using Figures 1–4, diagram the phases of mitosis and in the space provided to the right, describe the events of each phase using a chromosome number of 6 (2n = 6).

Figure 1. Prophase
Figure 2. Metaphase
Figure 3. Anaphase
Figure 4. Telophase
In plants, cell division cell division generally takes place in meristematic tissues where the plant is actively growing, at the apex of roots and shoots. An onion root may be divided roughly into four regions:
- the root cap-protective tissue composed largely of dead cells
- meristematic tissue-rapidly dividing cells located just behind the root cap
- elongating cells-located immediately behind the meristematic tissue
- mature and specialized cells-root hairs and other plant tissues
You will be examining cells of the meristematic tissue, located just behind the root cap at the tapered end of the root tip.
- Compound microscope
- Onion root tip slide
- In Figure 5 below, identify the phase of mitosis and write the name of the phase below each diagram. The cells go in the appropriate temporal sequence through cell cycle and you are likely to use the same term multiple times. While technically not a phase of mitosis, you may use “interphase” for some of the cells, but you should not use “cytokinesis.”
- Hold the slide of the onion root up to the light and note that there are several longitudinal sections on the slide. Examine all sections on the slide. Locate the meristematic tissue to observe phases of mitosis using high power.
- Find each phase of mitosis on the slide. As you locate each phase, your instructor will verify that you are correct and initial your paper. After you have received verification from your instructor, draw the cell in Table 1.

Figure 5. Mitosis in the onion root tip
Mitosis in the Whitefish Blastula
- Prepared slide of whitefish blastula
- In Figure 6, identify the phase of mitosis and write the name of the phase below each diagram. The cells go in the appropriate temporal sequence through cell cycle and you are likely to use the same term multiple times. While technically not a phase of mitosis, you may use “interphase” for some of the cells, but you should not use “cytokinesis.”
- Hold the slide of the whitefish blastula to the light and note that there are a number of sections on the slide. Examine all sections on the slide using high power to locate all the phases of mitosis.

Figure 6. Mitosis in the whitefish blastula.
- How does cytokinesis differ between plant cells and animal cells?
- What specific functions occur during interphase that prepare the cell for division. (These cannot be observed with the light microscope.)
- Label Figure 7 with the stages of cell cycle (interphase, G1, S, G2, M).

Candela Citations
- Biology 101 Labs. . Authored by : Lynette Hauser. Provided by : Tidewater Community College. Located at : http://www.tcc.edu/ . License : CC BY-SA: Attribution-ShareAlike
- BIOL 160, General Biology with Lab. Authored by : Scott Rollins. Provided by : Spokane Falls Community College. Located at : http://opencourselibrary.org/biol-160-general-biology-with-lab/ . Project : Open Course Library. License : CC BY: Attribution

IMAGES
VIDEO
COMMENTS
Because of the rapid rate at which onion root tips grow as a result of rapid cell division, it's possible to observe and identify the different stages of mitosis. For this section, the experiment will be divided into two main parts. These include: * Growing fresh root tips is recommended given that older or dried roots may produce poor results.
Objective of the experiment • To better understand the mitosis and different stages of mitotic processes. • To better understand the relative length of each stage of mitosis (can be estimated)
To study and demonstrate the mitotic type of cell division using the onion root tip cells. Mitosis results in the formation of two daughter cells that are identical to each other. Learn how the experiment is carried out.
In this activity, we’ll use lab data to test the hypothesis that lectin promotes mitosis in onion roots. The two variables for the activity are Phase and Treatment. Each row in the dataset is an individual cell observed with a microscope.
In this experiment, we will be using on onion root tip to show the different stages of mitosis. According to the National Human Genome Research Institute, “Mitosis is the process where the cells replicate their chromosomes and then segregates them, producing two identical nuclei in preparation for cell division.”
In this exercise, you will make models of chromosomes to study the meiosis chromosome replication and comparing mitosis with the process of mitosis. Materials: 8 magnets (= centromeres)
Dividing cells (if present) will show up clearly with chromosomes in different forms according to the stage of mitosis. Individual chromosomes (as tightly-coiled threads) are visible during anaphase. The links between the cellulose walls of plant cells are broken down by the treatment with hydrochloric acid.
Find, identify, and draw the phases of mitosis in the onion root tip and whitefish blastula. While the onion root cells tend to be arranged in a planar fashion, the whitefish blastula is more spherical.
Mitosis and cytokinesis are key processes in the growth and development of an organism. They are also the means by which wounds are repaired and dead cells are replaced. Mitosis is part of the normal cell cycle. There are three general portions of the cell cycle: Interphase, Mitosis, and Cytokinesis.
Walther Flemming studied and named the process of cell division as mitosis. Cell division occurs rapidly in growing root tips of sprouting seeds or bulbs. The most commonly used root tips in labs to study mitosis are onion, wheat, lentil, barley and alfalfa.